IBM Wheelwriter/Options/PC Printer: Difference between revisions
Antonizoon (talk | contribs) |
Antonizoon (talk | contribs) mNo edit summary |
||
| Line 41: | Line 41: | ||
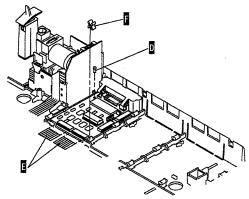
[[File:03-ww-printer-option.png|thumb|'''Fig. 3 (D, E, F)''': The Option card needs to be plugged in and locked into place.]] | [[File:03-ww-printer-option.png|thumb|'''Fig. 3 (D, E, F)''': The Option card needs to be plugged in and locked into place.]] | ||
# Disconnect the carrier cable. | # Disconnect the carrier cable. | ||
# Remove the electronic board cover. | # Remove the electronic board cover. | ||
# '''WHEELWRITER 10 typewriters''': Place the transport motor cable along the top of the round rear frame rail and install the two cable clips '''(L)''' if they are not installed. | # '''WHEELWRITER 10 typewriters''': Place the transport motor cable along the top of the round rear frame rail and install the two cable clips '''(L)''' if they are not installed. | ||
Revision as of 04:49, 4 October 2016
The PC Printer Option is a Parallel interface for printing from a PC, effectively transforming the IBM Wheelwriter into a daisywheel printer. Unfortunately, it was also expensive at the time, and remains rare to this day.
However, there are hopes that this accessory can be replicated on an Arduino, for attachment to a Raspberry Pi.
Variants
There are about 3 variants of the PC Printer Option, designed for different typewriter series.
- IBM Wheelwriter 5 - I've never seen this variant but all evidence points to it's existence. It uses a different connection wire than the WW3.
- IBM Wheelwriter 3 - A slightly newer variant of the Wheelwriter 5. It uses a different connection wire than the WW5, so even though the casing is the same, the option cards aren't.
- IBM Wheelwriter 1000/Personal Wheelwriter 2 - A smaller, lighter version of the Wheelwriter which requires a different design and shape for the option card than the WW1500.
- IBM/Lexmark Wheelwriter 6/10/1500/3500 (not sure if 2000/3000 supported) - These were the last Wheelwriters made, and are dual labeled with IBM/Lexmark. They are larger than the 1000/WW2 series, but the same size as the WW5/WW3 series. These Wheelwriters supports printing backwards, cutting the printing time in half. When it takes 2 minutes to print with previous models, that's quite an improvement.
Installing the PC Printer Option (Wheelwriter 5/Wheelwriter 3)
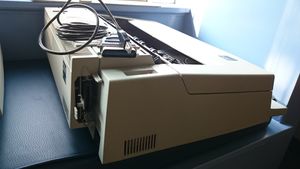
For these typewriters, installing option cards is pretty straightforward. The Option Card case just clips on the back, and then you attach the cable to the slot covered by a case flap on the top left. The end.
Installing the PC Printer Option (Wheelwriter 1500/3500)
These instructions are for larger Wheelwriters, not the Wheelwriter 1000/Personal Wheelwriter 2.
Modifying the Case
- Turn the machine off and unplug the line cord.
- Remove the top covers. Skip the next three steps if the diskette option is installed.
- Remove the platen, deflector and the left feed roller assembly.
- Connect the power supply/printer option cable to J2 on the power supply. The long end of the cable must be connected to the power supply. Use caution as the J2 connector may be difficult to see and could be damaged if the cable is incorrectly installed. Be sure the cable is installed correctly before you continue with this procedure.
- Install the left feed roll assembly, deflector and platen.
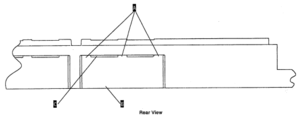
- Use a small screwdriver or craft knife to scribe the outside top tabs (A) of the knock-out panel next to the power supply in the rear of the bottom cover. Scribe the tabs several times. Also scribe the inside bottom tabs (B) of the knock-out panel several times. Insert a large screwdriver into the top slot of the knock-out panel next to the tab (C), Pry the knock-out panel away from the tab until the tab breaks.
- Bend the knock-out panel to the rear. Bend the panel back and forth several times to break it out of the bottom cover.
- Use a flat file to remove the burrs from the broken tabs of the knock-out panel.
Attaching the Option Card
- Disconnect the carrier cable.
- Remove the electronic board cover.
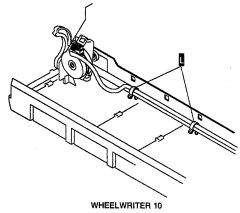
- WHEELWRITER 10 typewriters: Place the transport motor cable along the top of the round rear frame rail and install the two cable clips (L) if they are not installed.
- Note: The rear rail has been removed from newer level machines (e.g. Lexmark). The transport motor cable is attached to the transport bracket with a new clip.
- Place the printer option board into the bottom cover from the rear of the machine. The wire clips on the printer option connector should move freely and should not be trapped between the board cowling and the bottom pan.
- Install the printer option board mounting screw (D),
- Install the cables between the function board or system board and printer option board (E). The shiny edges of the cables should be up. Install the cables into the function board or system board first. Be sure the cables are aligned correctly before you close the connectors.
- Carefully push the two printer option board holding clips (F) onto the rib in the bottom cover. Do not squeeze the clips open to do this as they will remain open.
- Connect the power supply cable to J6 on the printer option board.
Install the Grounding Straps
- Install the 2 keyboard-to-shield grounding straps (G) on each side of the keyboard if they are not already installed. The strap for the right side of the keyboard is illustrated in Fig. 4.
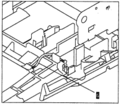
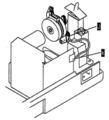
- Install the 2 frame-to-shield grounding straps (H, I) in Fig. 5 if they are not already installed. There is one for each side of the machine.
- Note: Newer level machines are manufactured with a new style clip (PN 1432479). If your machine has the new clip installed, do not install the ground straps.
- Install the ground strap with the ring terminal as shown in Fig. 6:
- Place the ring terminal and nut on the screw in the paperfeed motor bracket (J).
- Connect the clip end of the ground strap to the power supply bracket (K).
- Reinstall the electronic board cover and connect the carrier cable.
Apply Labels and Test PC Printer Option
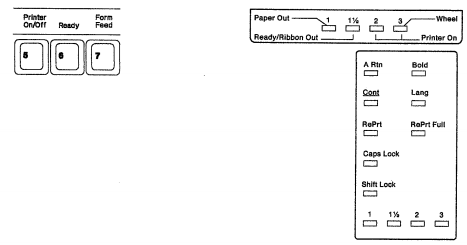
- If keys 5, 6, and 7 are not labeled as indicated in Fig. 7, install the keyboard label with Spell Assist on the left end.
- Plug in the machine.
- Test out the printer option board by pressing Code + 5. The display should change.
- If the printer option works, reinstall the covers.
Printing
Drop-in Replacement
There's some sort of mysterious electronic sequence going on in the PC Printer Option.
Input to Option Card
The PC Printer Option takes in plain ol' ASCII characters from the Centronics parallel port. Nothing fancy here, just write to `/dev/lp0` and you're done.
Output Card to Wheelwriter
Then, something magic happens in the black box of the option card that then causes the Wheelwriter to start typing. Now how would we figure out what is going on here?
I suppose we could intercept the electronic signals and do a replay?
And of course, one possible roadblock is that if it were easy to clone this card, IBM could not justify just selling it at a high price forever.
