IBM Wheelwriter/Options/PC Printer
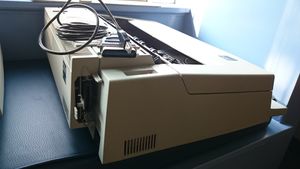
The PC Printer Option is a Parallel interface for printing from a PC, effectively transforming the IBM Wheelwriter into a daisywheel printer. Unfortunately, it was also expensive at the time, and remains rare to this day.
UPDATE: Thankfully tofergregg created an IBM Wheelwriter 3/6 compatible PC Printer Option using an Arduino without even having one. All you need is an Arduino Nano and some basic electronic components, which can even just be on a breadboard if you're not a soldering nut. It even allows you to use Markdown for the markup of basic bolds and underlines and such things. Unfortunately, we have yet to see something similar for the other Wheelwriter models.
Variants[edit]
There are about 3 variants of the PC Printer Option, designed for different typewriter series.
- IBM Wheelwriter 5 - I've never seen this variant but all evidence points to it's existence. It uses a different connection wire than the WW3, probably black.
- IBM Wheelwriter 3/6 - A slightly newer variant of the Wheelwriter 5. It uses a white connection wire than the WW5, which is black, so even though the casing is the same, the option cards aren't.
- IBM Wheelwriter 1000/Personal Wheelwriter 2 - A smaller, lighter version of the Wheelwriter which requires a different design and shape for the option card than the WW1500.
- IBM/Lexmark Wheelwriter 10/15/30/1500/3500 (not sure if 2000/3000 supported) - These were the last Wheelwriters made, and are dual labeled with IBM/Lexmark. They are larger than the 1000/WW2 series, but the same size as the WW5/WW3 series. These Wheelwriters supports printing backwards, cutting the printing time in half. When it takes 2 minutes to print with previous models, that's quite an improvement.
Parts List (Large PC Printer Option)[edit]
- PC Printer Option PCB - A complex expansion card which communicates through a Printer Parallel interface.
- AWM STYLE 20566 VW-1 - PARLEX-2890 -
PN-1432106-EC-532817- Some kind of ZIF ribbon cable. The longer one. - AWM STYLE 20566 VW-1 - PARLEX-2890 -
PN-1432107-EC-532817- Some kind of ZIF ribbon cable. The shorter one. - 1432108 -
EC-532698-GCA 02-64- Some kind of jumper cable, with 6-pin sockets, four of them. - Two Mounting Brackets - Two ABS plastic, custom-made mounting brackets. If you need them, I can try to design a model to print on a 3D Printer.
Installing the PC Printer Option (Wheelwriter 3/5/6)[edit]
For these typewriters, installing option cards is pretty straightforward. The Option Card case just clips on the back, and then you attach the cable to the slot covered by a case flap on the top left. The end.
Notice that the option card for the Wheelwriter 5 (has a black cable) is not compatible with the Wheelwriter 3/6 models (option card has a white cable), since the jacks and other circuitry is different. Beware.
Installing the PC Printer Option (Wheelwriter 1500/3500)[edit]
These instructions are for larger Wheelwriters, not the Wheelwriter 1000/Personal Wheelwriter 2.
Modifying the Case[edit]
- Turn the machine off and unplug the line cord.
- Remove the top covers. Skip the next three steps if the diskette option is installed.
- Remove the platen, deflector and the left feed roller assembly.
- Connect the power supply/printer option cable to J2 on the power supply. The long end of the cable must be connected to the power supply. Use caution as the J2 connector may be difficult to see and could be damaged if the cable is incorrectly installed. Be sure the cable is installed correctly before you continue with this procedure.
- Install the left feed roll assembly, deflector and platen.
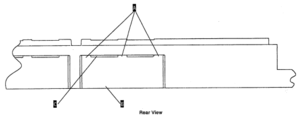
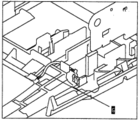
- Use a small screwdriver or craft knife to scribe the outside top tabs (A) of the knock-out panel next to the power supply in the rear of the bottom cover. Scribe the tabs several times. Also scribe the inside bottom tabs (B) of the knock-out panel several times. Insert a large screwdriver into the top slot of the knock-out panel next to the tab (C), Pry the knock-out panel away from the tab until the tab breaks.
- Bend the knock-out panel to the rear. Bend the panel back and forth several times to break it out of the bottom cover.
- Use a flat file to remove the burrs from the broken tabs of the knock-out panel.
Attaching the Option Card[edit]
- Disconnect the carrier cable.
- Remove the electronic board cover.
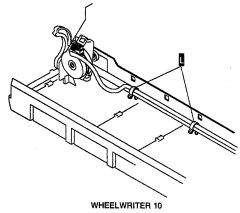
- WHEELWRITER 10 typewriters: Place the transport motor cable along the top of the round rear frame rail and install the two cable clips (L) if they are not installed.
- Note: The rear rail has been removed from newer level machines (e.g. Lexmark). The transport motor cable is attached to the transport bracket with a new clip.
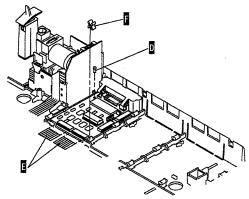
- Place the printer option board into the bottom cover from the rear of the machine. The wire clips on the printer option connector should move freely and should not be trapped between the board cowling and the bottom pan.
- Install the printer option board mounting screw (D),
- Install the cables between the function board or system board and printer option board (E). The shiny edges of the cables should be up. Install the cables into the function board or system board first. Be sure the cables are aligned correctly before you close the connectors.
- Carefully push the two printer option board holding clips (F) onto the rib in the bottom cover. Do not squeeze the clips open to do this as they will remain open.
- Connect the power supply cable to J6 on the printer option board.
Install the Grounding Straps[edit]
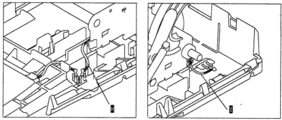
- Install the 2 keyboard-to-shield grounding straps (G) on each side of the keyboard if they are not already installed. The strap for the right side of the keyboard is illustrated in Fig. 4.
- Install the 2 frame-to-shield grounding straps (H, I) in Fig. 5 if they are not already installed. There is one for each side of the machine.
- Note: Newer level machines are manufactured with a new style clip (PN 1432479). If your machine has the new clip installed, do not install the ground straps.
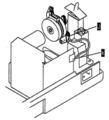
- Install the ground strap with the ring terminal as shown in Fig. 6:
- Place the ring terminal and nut on the screw in the paperfeed motor bracket (J).
- Connect the clip end of the ground strap to the power supply bracket (K).
- Reinstall the electronic board cover and connect the carrier cable.
Apply Labels and Test PC Printer Option[edit]
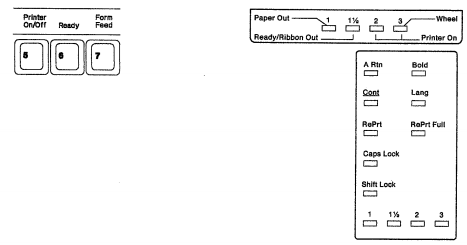
- If keys 5, 6, and 7 are not labeled as indicated in Fig. 7, install the keyboard label with Spell Assist on the left end.
- Plug in the machine.
- Test out the printer option board by pressing Code + 5. The display should change.
- If the printer option works, reinstall the covers.
Printing[edit]
Printing to the IBM Wheelwriter can seem like a difficult task, but it’s much simpler and more reliable than many may imagine. Forget modern printers, with their horrifically expensive ink, incomprehensible error messages, and exceedingly complex drivers. Like a daisywheel printer, simply toss text at this typewriter via the parallel port, and it will print text. Why should anything be more difficult?
Centronics to Parallel Port/USB[edit]
Like most Daisywheel/Dot-Matrix Printers from the 1980s, the IBM Wheelwriter Printer Option uses a 36-pin Centronics Printer Port. This port can be hooked up to an ordinary DB-25 Parallel Port on an older PC, using a Centronics-to-Parallel Cable.
For modern computer enthusiasts, the Centronics Port can still be hooked up to modern computers via USB, using adapter cables: http://www.amazon.com/dp/B0000510T7/
Remember that obviously, the typewriter can only print whatever is on the printwheel: ASCII Characters in a single font.
Printing from Windows (Generic/Text Only Driver)[edit]
Windows still has the option to use the ancient “Generic/Text Only Driver”. Just like DOS, this “driver” simply tosses text at the parallel port. Simply install this driver after plugging the parallel cable into the PC.
Unfortunately, this driver lacks helpful configuration options (notably, the margin size cannot be reduced). Stick to FreeDOS or Linux if the Windows drivers aren’t enough.
- First, press
Codeand the5key at the same time on the IBM Wheelwriter. This will enable Printer Mode. Then, load paper into the typewriter. - Plug in the Centronics cable into the IBM Wheelwriter 3 PC Printer Option, on the back.
- Plug in the cable into the Windows PC. Wait for the parallel device to be installed completely.
- Go to Control Panel -> Devices and Printers.
- At the top right toolbar, click Add Printer.
- For a Parallel to Centronics cable, choose COM1 for the parallel port.
- For the USB to Centronics cable, choose USB001 for the parallel port.
- Click Next.
- In the manufacturer column, choose Generic. In the Printers column, choose Generic/Text Only.
- Type in a name for the printer: such as “IBM Wheelwriter”.
- Print a test page. If it works, wait for it to finish, then click Next.
- Make sure to enable printing mode (
Code+5) and put in some fresh paper before starting a print job.
- Make sure to enable printing mode (
- The IBM Wheelwriter can now print from Windows.
Printing from MS-DOS/FreeDOS[edit]
This is the way daisywheel printers were meant to be used. Just hook it up to an MS-DOS computer, no drivers needed. FreeDOS is an open-source drop-in alternative to MS-DOS, and will also work.
The simplest method is to send text to COM1. The typewriter will immediately print text. Just press the PrintScreen key whenever you need to print all the text on the screen.
Alternatively, when using a word processor application, choose Print to send data to the printer.
Printing from Linux/Mac (CUPS)[edit]
- Add printer from Parallel Port (set USB parallel if using USB cable).
- Use Generic/Text Only Driver.
- Now you can print your documents to the typewriter in a snap!
Printing from Linux/Mac (/dev/lp0 or /dev/usb/lp0)[edit]
For direct control over the typewriter, UNIX-style operating systems can simply cat text into /dev/lp0 (or /dev/usb/lp0 for USB cables) and it will print whatever gets written.
Here’s a simple bash script:
#!/bin/sh
# /usr/local/bin/print
# 9/99 script for printing from console
        [ "x$1" = "x" ] && {
        echo "Usage: print {file}";
        exit;
        }
        cat $1 > /dev/lp0
Of course, this method requires the user to enforce their own character limit on each line, or the typewriter will run off the paper. Quite an unwelcome blast from the past.
On the other hand, the user has full control over the text sent to the typewriter, and it responds immediately.
Perhaps a Markdown-based print script can be produced. Or, hook up an IBM Model M to the computer, set up a TTY display to /dev/lp0, and create an impromptu teletype!
Basic Printer Option Analysis[edit]
There's some sort of mysterious electronic sequence going on in the PC Printer Option.
Input to Option Card[edit]
The PC Printer Option takes in plain ol' ASCII characters from the Centronics parallel port. Nothing fancy here, just write to `/dev/lp0` and you're done.
Output Card to Wheelwriter[edit]
Then, something magic happens in the black box of the option card that then causes the Wheelwriter to start typing. Now how would we figure out what is going on here?
Try to do some signals intelligence and figure out which commands do what, by hacking in to the connection between the Printer Option and the Option Card. Maybe we could replay certain commands?
A major pitfall may be IBM's own proprietary defenses against reverse engineering. Maybe we can look for the patent for this thing?
Sources[edit]
- Google Docs - Enhanced Transcript of PC Printer Option PDF
- CNet Forums - Need Help Installing a Daisywheel Printer
